Wednesday, January 26, 2022

The Battle of the Temple, 15mm Hail Caesar

 We had a cracking game of 15mm Hail Caesar today. It was the first battle in a planned 3 game mini (imaginary) campaign between Sparta and Persia. The dice decided that Phil and I were the Persians with Ian and Howard taking on the role of the Spartans. This first battle was a small clash of about 250 points per side. The scenario was as follows...

Sparta v Persia 480BC. A Hail Caesar mini-campaign, pt 1. Jan 2022

It is 480BC and having defeated the 300 Spartans at Thermopylae the Persians are now rampaging through southern Greece pushing quickly through Arkadia into Laconia. The Persians are destroying towns and temples, crushing all resistance. As the Persians enter Spartan lands they divide their forces to cause widespread destruction and terror. The Spartans have sent out a small army to counter one such attack. The two forces meet by the Temple of Artemis.

The Battle for the Temple

Objectives: As well as fighting the Persians the Spartans must try to prevent the Persians from destroying the Temple of Artemis, rescue the Seer Thalia and also light the beacon to warn the rest of Sparta of the whereabouts of the Persians.

Beacon: it takes 1 turn stationary to either light or destroy the beacon.

Temple: it takes two turns stationary to destroy the temple.

The Seer, Thalia: (gains her insights by speaking to birds). Which ever side wins control over Thalia will be able to use her abilities next game.

The winning army may add +1 to the Leadership Value of their main general (to a max of Ld 10) from the next battle onwards.

Leadership Abilities: Before the game begins you must roll 1x d6 to randomly allocate an ability to each of your leader figures.

1: Hesitant Commander, Leadership quality is reduced by -1

2: No Bonus

3: Strategist: this clever leader will always deploy his troops last.

4: The Gods will it! The first time this leader needs to take a break test he may re-roll the lowest scoring die of the two.

5: Fierce Fighter: this leader gains an extra +1 dice in melee, every round!

6: Bold Leader: this Leader gains +1 to his Leadership value.

Campaign Casualties: after each battle of the campaign throw a d6 on the table below for any Leader that was 'killed' during the game to see if they are fit to carry on...


Injured in Melee

D6

Injured from missile fire

A bit bruised and battered but fit to carry on.

1

A mere flesh wound and fit to carry on.

A bit bruised and battered but fit to carry on.

2

A mere flesh wound and fit to carry on.

Heavy wound, must miss the next battle.

3

Heavy wound, must miss next the battle.

Heavy wound, must miss the next battle.

4

Heavy wound, must miss next the battle.

Captured by the enemy

5

Dead

Dead

6

Dead

Any leader figures who get a 'Dead' result will be replaced next game with a new leader figure (Leadership 7), roll a dice for their ability.

Mercenary Units: each command figure may try to recruit mercenaries before a game. Throw 1xd6 on a 4+ you have succeeded in your recruiting and need to throw another

1x d6 on the following table...recruiting one unit of the type thrown for...

1: Cretan Archers

2: Rhodian Slingers

3: Light Cavalry

4: Peltasts

5: Hoplites

6: Medium Cavalry

From all of this the dice decided that Howard's Spartan commander (Brasidas) got a free re-roll on a Leadership test and an extra unit of Cretan Archers and my Persian Commander (Artabazus) had his leadership raised to 9.

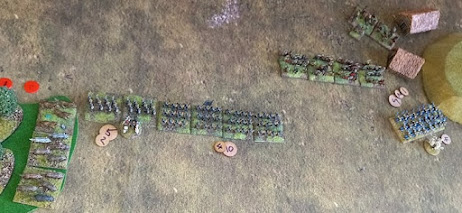
So the Spartans deployed first but the Persians were able to seize the initiative and move first. Good dice throwing enabled all Persian units to do triple moves meaning they could get to the bridge close to the beacon and also be up on the hill close to the temple. Amazingly the Spartan's also got triple moves so by the end of turn 1 both armies were very close. 

Initial deployment, the Spartan Dokana is representing the beacon. 

The Spartan force

The Persian force

The Persian light cavalry racing for the bridge to destroy the beacon. 

The Persian's manage to capture Thalia the Seer very early in the game.

The Persian left flank. 

The beacon about to be destroyed by the Persian light cavalry who proved to be the most successful unit on the table as they also destroyed the Greek light cavalry and pushed back their medium cavalry too.  

The Persian right flank heavily engaged with the Spartan hoplites. In previous games the Spartans had proved to be far to hard for the Persians but it was a very long and close struggle over about 3 or 4 turns today before the Spartans narrowly won that flank as the depleted Persians finally had to withdraw. . 

On the left flank, the Persians managed to beat the Spartans after another epic and long tussle, (yellow counters equal 'shaken' and red 'disordered'). Both Spartan commanders Brasidas and Polydeukes were wounded as was Phil's Persian commander Datis. By now both sides were heavily battered, full of shaken and dis-ordered troops so a general withdrawal was called by both sides. This was a very close game played over 8 turns and could have gone either way, brilliant fun. 
The Persians had done slightly better than the Spartan's as they had destroyed the beacon and captured the seer but failed to destroy the temple. Next time the two forces meet the Persian's will be able to use the Seer and her powers to aid their battle plans.   


Wednesday, January 19, 2022

Rapid Fire: The Allies advance.

 We returned to WW2 (Rapid Fire) gaming today with Ian and Nigel taking on the role of the Allies (with Ian's very nicely and newly painted American AFV's), Phil and I led the stout German defenders. The scenario was simple, could the numerically superior Allies break through the German lines in under 12 turns?  

The Germans start to dig in. 

The allies had to plot some off table artillery support before their attack commenced and they succeeded in killing a German mortar team and reducing two buildings to rubble. 

Ian's M36 tank destroyers advance supported by two Cromwell's.  

In the first two turns the Allies advanced so quickly we though the game may be over in a very short time. However, as the two sides began to spot each other and the shooting began it seemed the Germans had the upper hand. Phil's Panther took out a first Sherman and my Pz1V's took out another. The allies soon struck back with one the Cromwell tanks hitting and destroying the panther. The German's were certainly weakened by losing the Panther so early on in the game.  

The sherman's rapid advance quickly took them very close to the German lines. Then their armour and the morale proved to be very brittle as all but one of them were destroyed.
 

The allies tried to block the German line of fire with smoke. 

Nigel and Ian looking confident. 

A view of the allies advancing. 

M36 tank destroyers advancing through the woods.
(the yellow counter indicates light damage).  

The Pz 1V's managed to hold their flank easily outgunning the Sherman's 

The German sniper hiding in the white building only managed to take out two allied soldiers before being over whelmed. 

The Cromwell's and the tank destroyers supported each other well. 

The American M36 tank destroyers having cleared the German resistance advance rapidly to the far table edge and victory. 

It was a very enjoyable game that seemed split into two halves. The Germans held of the Allied advance on their left flank but could not stop them on the right. It took the allies 8 turns to break through and win the game. 


Tuesday, January 18, 2022

'Fantastic Battles' in Middle Earth

 Today I drove down to Chris's house for a Lord of the Rings themed, 10mm game of 'Fantastic Battles'. We are really enjoying this ruleset and are collecting (and rebasing) armies in three different scales  (6mm, 10mm and 15mm). Chris as host came up with the scenario which was basically early war, 3rd Age, trying to take out each others leader figures to rob the enemy forces of some of their main leader figures. This is how the board looked after deployment and mishaps.


The ruined tower on the hill soon became a major pain for my cavalry as they tried to manoeuvre around it. Chris's warg's on the far side also got entangled with the hut at the top as it got in the way of them riding my rangers down. 

The mishaps pushed units forwards on both sides on my right flank and my Ithilian Rangers on the top left also rushed out of the safety of the woods for some strange reason. It took me turns to get them back into the woods only for them to be charged by some warg riders. 

My elf cavalry raiders with bows were quite useful at shooting the enemy and later, charging the trolls in the flank. The Elf knights slowly made their way forward, led by Elrond. Some enemy warg riders with bows hurt the knights badly before the elves were able to charge and destroy them. Sadly we destroyed ourselves in the process. 


In the centre Chris's trolls came charging into my elf spearmen who laughed in the face of danger and skewered the trolls on their long spears over the next two turns, helped by the elf raiders.  

Turns 4 and 5 were a huge scrum of a melee in the centre. The last photo shows what was left after turn 5. With Elrond defeated just off photo (top right) the Men of Gondor have killed the ringwraith on the left and the Orc Warlord in the centre. Both forces also reached over half casualties after the effects of loss of resolve had been worked out along the line. Thus both forces withdrew and the game ended in a very enjoyable draw.  What a great game!
We are experimenting with our armylists each game, trying to create our version of Middle Earth. We are nearly there but need to play a few more games to try out more traits and spells etc...
Driving home I was trying to decide whether to paint more dwarves or start on my Rohan force? 


Wednesday, January 12, 2022

General de Brigade with old Mini Figs and Hinchcliffe armies

 Today Ian and I drove across to Nigel's house to see his new wargames room and try a game of General de Brigade Napoleonic rules with his very large collection of classic Mini Figs, Hinchcliffe and Lamming miniatures. Nigel started this collection in the late 1970's I believe and he continues to add to it. There are even more figures in the shelves behind him. 


Nigel's wargames room is amazing with space for a 12 foot x 4 foot table. He has also created loads of storage for his impressive collection of figures (in many periods) and some very well stocked bookcases (I am very jealous). 
Of course, with so many figures available we were far too ambitious in our game with too many figures on the board and only a sketchy understanding of the rules. The scenario Nigel had set up was loosely based on Quatre Bras with the French attacking the Dutch. After a couple of turns we did start to get the hang of the rules and the game flowed more quickly from that point. 


It was a very impressive looking game if a bit crowded. Nigel was in charge of the French whilst Ian and I took control of the Dutch. The main clash of the game saw my light cavalry outmanoeuvre and beat the French Lancers causing them to pullback unformed. However, Nigel got his revenge by getting his Cuirassiers to charge straight through my artillery. Here are some more photo's of the action. 


On the other flank both sides advanced cautiously with little action occurring.

Doesn't this look great. 


Dutch Light Cavalry show the French Lancers how to fight!

Last action of the game, my artillery get ridden down. 

It was a shame we didn't have time to finish the game and next time we play we need to be slightly less ambitious with the size of game. I loved the 'feel' of the game created by using such classic figures...very tempting! 
Thanks for a great day's gaming Nigel. 


Tuesday, January 4, 2022

First game of 2022: 15mm Rapid Fire

 So our search for a club set of WW2 wargame rules continued today with our first game of 2022 using the popular Rapid Fire rules. We used the small starter scenario from the rulebook, 'Lingevres'-a British attack on a German held village (with a few minor tweaks to the terrain and the forces to better match my collection). 

I had also been quickly painting up a few extra German troops and vehicles and also added a mdf shop and some (almost finished in time) hedges/bocage created from the sponge part of some old pan scourers. 

A couple of newly painted Pak40's in front of nearly finished hedges. 

Three recently finished half-tracks travel past my newly made and painted mdf shop. The mdf building kits turn out quite nice after a quick paint job. 

So with two players a-side Ian and Phil took on the role of the advancing British and Nigel and I were the small holding force of Germans. The British troops had 12 turns to capture the village but they were suspicious of German re-enforcements for the whole game. 

Phil's Sherman's advance and chase of my OP before then shooting him in the back. 
The German infantry fall back on the protection of the ruins (we used a factory instead of the suggested church).
The British were advancing across the board. 
The view from Nigel's side of the table. His infantry did not last too long and his Panther tank proved to be a bit of a lousy shot. 
The Sherman's picked off my HQ unit and their half track and went onto clear the buildings of the remaining infantry with a bit of help from Ian's troops in the centre. 
Nigel's Panther lurking in the village trying to hit something, it did eventually soften up one of Ian's Cromwell tanks. By turn 8 things were looking desperate for the Germans then...
The German re-enforcements arrived, right on Ian's flank. Nigel took control of one Pz4 and blew up a Cromwell first shot. 
...I took control of the other Pz4 and with my first shot blew up the damaged Cromwell. At this point, the British opted to withdraw leaving the Germans in control of the village. Their Sherman's obviously did not fancy taking on a Panther and 2x Pz4's. 

The timely arrival of the German re-enforcements and their lethal shooting completely turned the game around and made for a very exciting finish. We all enjoyed the game (and the rules) and have agreed that these will be our rules of choice for WW2 gaming. We were a little unsure over one or two aspects of the rules but I am sure a careful re-read will sort most things out before our next game. 


Trying 'General D'Armee' v2 in 15mm

  Howard, Ian and Nigel have been playing a few games of the new version of 'General D'Armee' and this week I was able to go alo...