Tuesday, December 19, 2023

'Never Mind the Matchlocks' trial game in 15mm

 Andy Callan, the author of 'Never Mind the Billhooks' was asking for volunteer's to play test an ECW version of the rules ('Never Mind the Matchlocks') and I offered our little gaming group as guinea pigs. Happily Andy has kindly agreed to let us take part in the play-testing of his new rules so today we had our first game. 

With the rules aimed primarily at 28mm figures we had a few issues to sort as we game the ECW with multi-based 15mm figures. However it was an easy fix as we simply used each base of our figures as 'counts as' and casualty markers to keep score of losses without figure removal. 

Before today's game started I took a few photo's of some of my recently completed ECW troops. 

Lord Bright's Regiment of Greencoate's, posing in front of some of our recently painted Hovel's buildings. Hovel's resin buildings are great, full of detail and look wonderful once painted.  

One of two limbers I painted over the weekend. 

I have also added 3 more bases of cavalry and thought a group photo could look impressive. 

We are gradually collecting and painting a whole small town. 

This photo shows the very good 15mm scale of the buildings. 

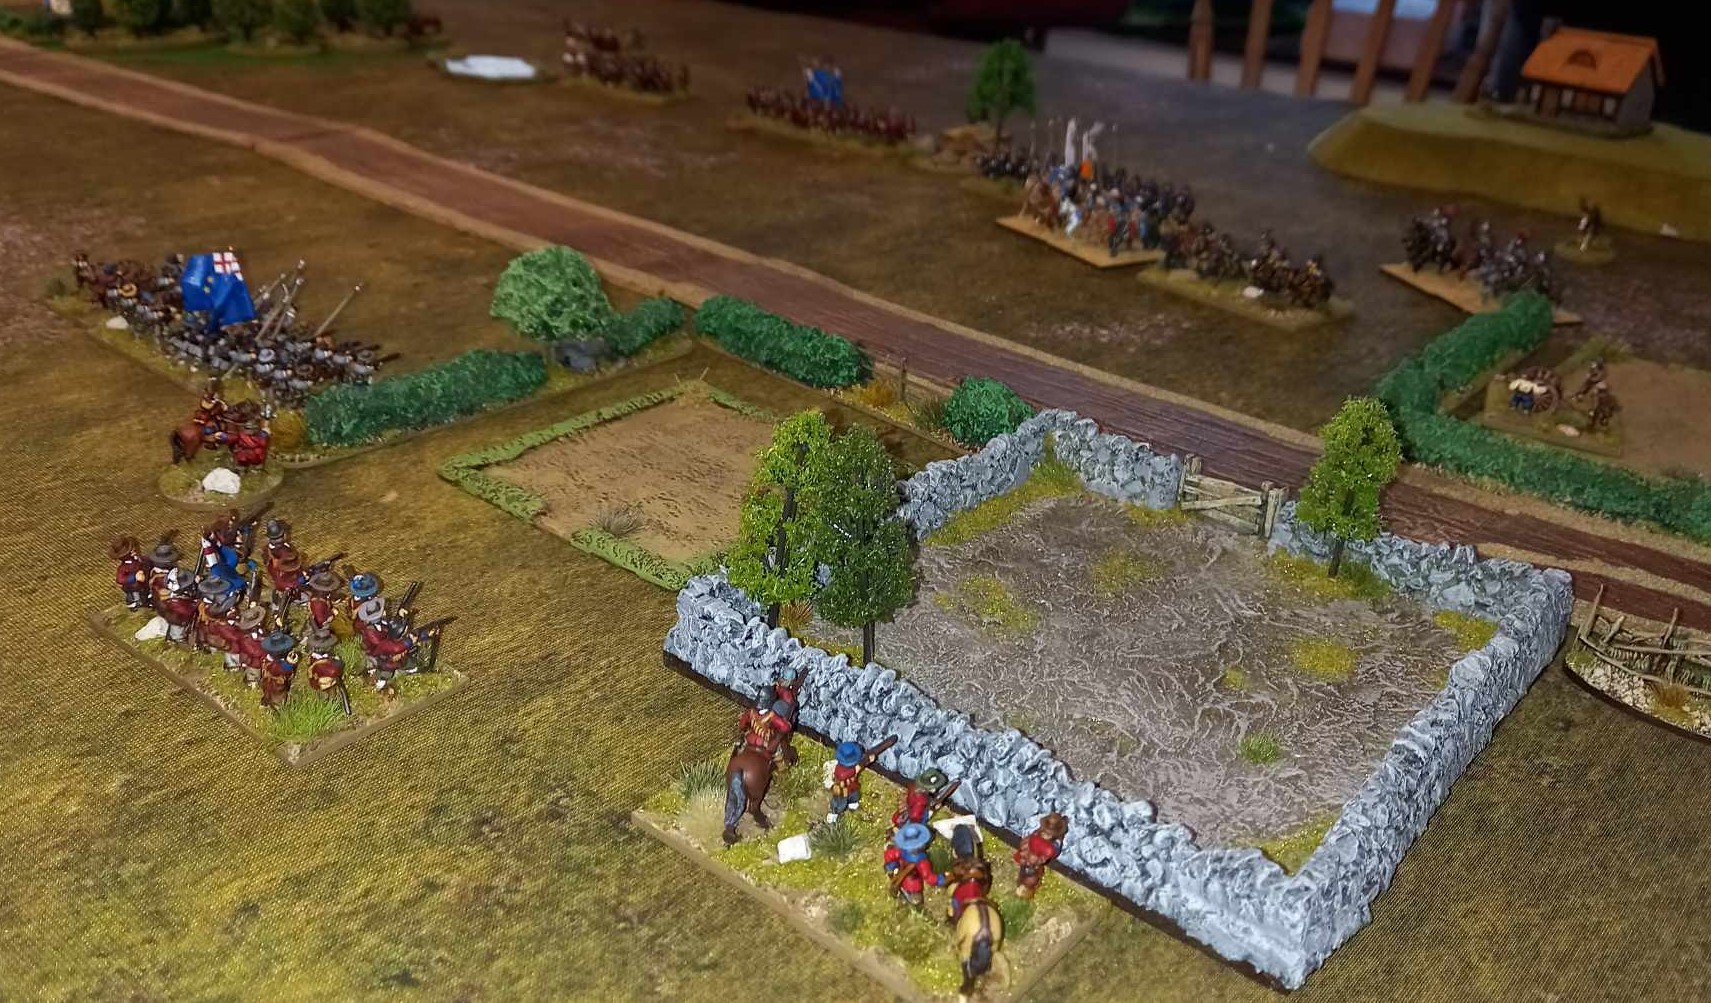
Using similar and decent sized forces of 135 points per side, I had set up fairly symmetrical scenery. This was to be a straightforward encounter battle with the simple aim to capture the crossroads. Ian was in control of his Royalists aided by Nigel as his Brigadier of cavalry. I was in charge of all the Parliamentarian troops. 

Alternatively deploying one Brigadier and the troops under their command at a time, final deployment looked like this, Royalist at the top, Parliament at the bottom. 

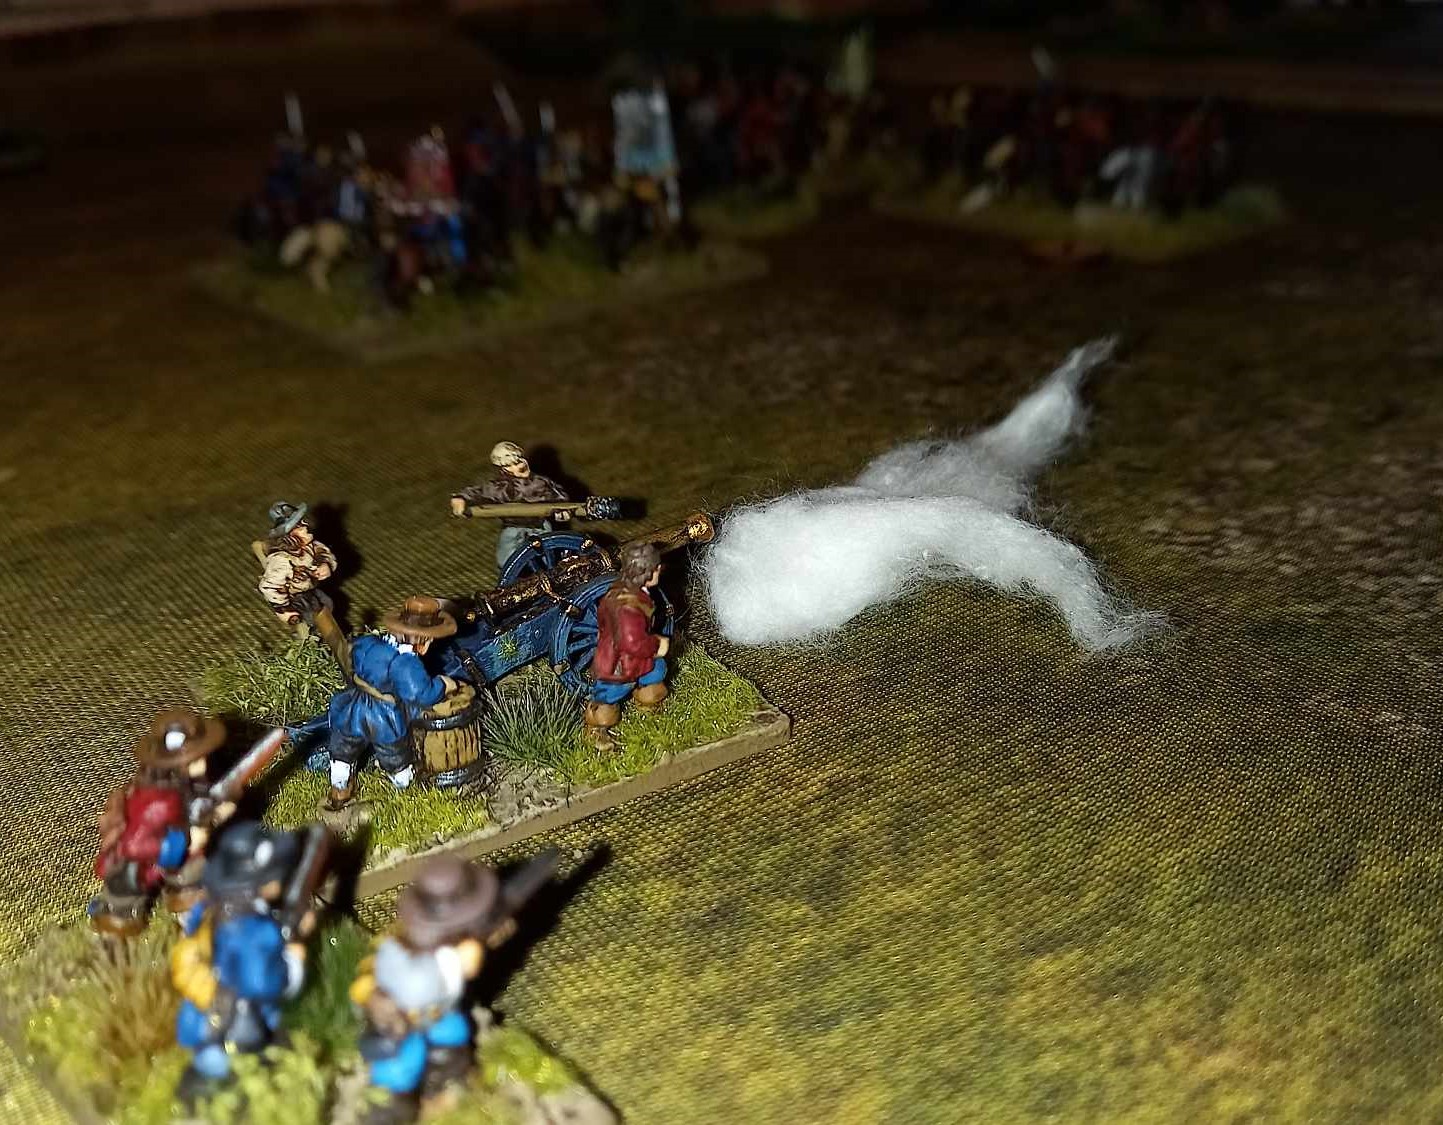
The manoeuvre phase ended when my light cannon shot at the Royalist Musketeers heading down the road, three '6's out of four dice, great shot! 

View from behind Royalist lines. Cotton wool denotes who has fired. 
Note the church that Ian has painted this week, lovely model. 

Red dice denote how many rounds a musket unit has left. 
Ian now declared, 'this is how you do it' to Nigel as he charged his battalia in, only to be defeated in melee and then throw a double 1 on his Melee Crisis Test! 
That gave us all a good laugh. 

My cavalry attacked on my right but Ian passed a test to get his Pike and Musket unit into a hedgehog which then narrowly defeated my squadron of cavalry. In their rout they took another of my cavalry units with them and that was my mounted attack on the right finished!

The centre of the battle with units of Pike and Shotte in a faceoff/shootout over the hedges. 

The failed cavalry attack.
Soon after this and with time running out, with the Royalists having 3 morale tokens left and my Parliamentarians just two, a narrow victory for the Royalists was declared. Both sides were in a lot of Disarray and most units had run out of ammunition. 
This was a closely fought and fun game. The rules worked well  and suit the period although we were having to check a few things in the rules as the game played out and we do have a short list of questions and suggestions for Andy to consider. 
We play Never Mind the Matchlocks again at our next meet on Jan 9th. 


Tuesday, December 12, 2023

The Battle of Tewksbury, 1471 using 'Never Mind the Billhooks'.

 Today's game was hosted by Charlie and he had created a wonderful scenario based on the Battle of Tewksbury for us and we used 'Never Mind the Billhooks' for rules. We were all a bit rusty with the rules and with around 400 points per side it was a big game to get our heads around. However, after a turn or two we soon speeded up. Charlie even made extra cards to cope with the number of leaders and units.  

The General's deploy their troops, Ian must have know he was going to be Lancastrian as he came dressed in red. Charlie and Nigel were commanding the Yorkists and I was helping Ian. 

The Duke of Somerset deploys his troops... 

...and Edward IV deploys his men. 

Let battle commence. 

William Stanley and his ward heading of on a march round to attack the Lancastrian right flank. 

First artillery attack of the day from the Yorkists and 4 hits scored!

Ian sends his troops forward on the Lancastrian left. 

Sir William Stanley advances down the road (mid photo on the right). 
At this stage of the battle it was mainly missile fire as the two sides jockeyed for position. 

On the Lancastrian right some of their troops were delayed in their advance by the terrain and by needing to cross the river by the bridge. 

The Duke of Gloucester advances. 

On the first 'Special Event' card the Lancastrians were able to launch a surprise attack towards the rear of Yorkist troops. Despite catching Nigel in the flank, my troops threw poor dice and Nigel not only survived the flank attack but he was then able to turn and easily defeat my troops. (note to self, try not to attack enemy Men at Arms with anything other Men at Arms).   

The close packed terrain and sheer number of troops meant that we Lancastrians struggled to get as many of our troops into the battle as we would have liked. Our artillery never had the chance for a shot all game.  

Suddenly, the Yorkist, Sir Maurice Berkeley arrived far on the Yorkist right with his light horse who immediately advance towards the Lancastrian troops near the bridge. 

Meanwhile the Yorkist artillery piece that was causing damage exploded!

Five turns in and with most missile troops running out of arrows etc... it was time to get stuck in. 

The Duke of Gloucester with his Men at Arms thumping some of Ian's Billmen.

At this point we ran out of time but we all felt that the Yorkists had the upper hand and were steadily pushing the Lancastrian's back. Despite Edward Prince of Wales actually surviving our battle unlike in the real fight a Yorkist  victory was declared and history was mostly repeated suggesting that Charlie had got the balance of the scenario just right? 
Once again this was a great game and we all agreed we had left it far too long in between games of Billhooks. Next week we hope to play test the new ECW version of Billhooks called 'Never Mind the Muskets' which author Andy Callan has very kindly shared with us. 


Wednesday, December 6, 2023

6mm Fantastic Battles: Dark Elves v Dwarves

 Friend Chris and I met up today for our first game of Fantastic Battles using our recently painted 6mm armies. The figures are nearly all from the Irregular Miniatures 6mm Fantasy Range, a wonderful selection of all sorts of fantasy (of which Chris has far too many!) 

After our usual pre-game chat and banter we set up on my home made 6mm sized mat with Chris (Dwarves) as the defender and me (Dark Elves) as the attacker.  We are using 25mm square bases and inches (25.4mm) for measurements. 

Initial deployment, dwarves on the left, Dark Elves on the right.
Mishaps did not do too much damage, just a few points of 'Resolve' lost here and there. 

Looking across the dwarven army, small but tough as I found out. 
To add variety to the number of troop types Chris has used some of the Dark Dwarf range as well as the usual Dwarf figures. He had 19 companies in total. 

The Dark Elf army pose for their team photo, 17 companies in total. 

The dwarves employed some centaur allies: note how Chris has cut the strips up to create a better skirmish formation. 

The two forces close upon each other.

Welcome to the battle! The Dark Elf Dragon and Lizard riders charge into the centaurs and scatter them for the loss of just three resolve.  

The dwarf artillery, top left played havoc with my Dark Elf skirmish units which were supposed to wipe them out. The artillery also shot and killed my giant lizard. 

Whack! A huge melee starts in the centre where I found out how horrible it is to fight Doughty Dwarves in Shieldwall. But then the dwarves did not like my Furious Charge and use of Poison. On the right of the main melee the Dark Elf Magic User 'Blinks' a whole unit of Dark Elf warriors into the melee so that I now outnumber the dwarves. The dragon now charged into some dwarf crossbow troops.

This was a tense really hard fought melee over two or three turns. 
Great to see two tough but completely different armies fighting it out. 

End of turn 5 and the Dark Elf Lizard Riders at the left of the melee scatter the Dwarf Warriors in front of them and my Dark Elf Wizard 'Blinked' some Dwarf Crossbow troops on the right out of the fight. Top right and the Dwarf Artillery and Dark Elf skirmish troops manage to scatter each other.  
Sadly we had to finish here so I could get home before the horrendous tea-time rush hour traffic. With the score at... Dark Elves have lost 4 out of 17 companies and the Dwarves have lost 7 out of 19 companies. So with the Dark Elves slightly ahead and looking how things stood, it looked almost certain that the Dwarves would lose another 3 companies in the next turn if we had chance to play it, thus reaching their breakpoint. The Dark Elves would also probably have lost 3 or 4 more companies next turn taking them perilously close to their breakpoint. A really tight game and showed that Fantastic Battles is just as much fun in 6mm as it is in larger scales. You can tell I enjoyed myself as I am currently planning which units to paint next and what new army/armies to buy in 6mm.   


Tuesday, December 5, 2023

More 15mm ECW with 'Victory without Quarter'.

 We enjoyed last weeks ECW game so much we decided to have another.  Using the 'Victory without Quarter' rules once again I used a scenario from one of the ECW Gaming scenario books which has a small battle taking place around the village of Penpont in 1651. I chose this battle for two reasons. It suited the size of forces we currently have available and it is placed just two miles from where my Dad and Brother now live. Next time I visit them I can see me going down to Penpont for a good look around. 

A couple of newly painted 15mm houses (from 'Hovels') to help me create the village of Penpont on the table and a couple of new Command bases. 

As this was originally quite a small battle and it was going to be a multi-player game I deployed the troops as recommended in the book then threw in a few more units to give everyone plenty to control. After all, these are still learning games for us whilst we get our troops painted up. It seems that the Royalists who had been busy recruiting in the Dumfries area were now intent on attacking the Parliamentarian troops based in Drumlanrig Castle. 
The Parliamentarian troops need to drive the Royalists out of Penpont to ensure they control the north/south road which was important as a main road for supplies back then. 

Charlie and I took control of the Parliamentarian forces on the near side of the board whilst Ian and Nigel commanded the Royalists within the village. Note all the horse at the top of the photo. Dice throws decided that there would be two Buffoons and one Idiot commander on the table. They helped create mayhem. 

One unit of Royalist Pike and Shotte had to get over the bridge and into the village which the draw of the cards allowed them  to do quite quickly.  

An early charge from Charlie's Parliamentarian cavalry soon gained the upper hand in that melee.  

This was the start of some hilariously bad morale checks by both sides from Charles and Nigel. Charlie managed 2 double ones and a 2 and a 1, Nigel also got a double one and a few other poor scores. Chaos ensued on the left flank cavalry clash.  

The Royalist infantry finally get into the village, supported by a Field Gun. . 

Charlie finally defeats the Royalist Cavalry, which is what happened in the real battle. 

Charles' cavalry tried to catch the Royalist Infantry in the flank but did not quite make it and suffered from their musketry. 

Bit by bit the Parliamentarian numbers slowly wore the Royalist forces down and with the end of gaming time looming a Parliament victory was declared. The Royalists had lost most of their cavalry and an infantry unit with the other one routing they fled back to Dumfries, their recruitment plans in tatters. 
Another great game full of dramatic moments. In most instances the rules work really well and give a fun game.There are still a few areas of the rules we are unsure of but we managed to reach a sensible agreement over most issues. 
For now the painting (recruiting) continues and we will play again soon.  
Next week we play Charlies re-fight of Tewksbury using the 'Billhooks' rules, should be a great game. . 


Tuesday, November 28, 2023

15mm Victory without Quarter.

 For our first game of 'Victory without Quarter' in 15mm we played a basic made up battle scenario, very much as a learning game. With several units per side I took control of the Parliamentarians with Ian and Nigel in command of the Royalists. 

We had tried the rules before using our 6mm figures but felt then that they would better suit 15mm so we gave it a go. The two armies were limited by our narrow range of units available at the moment, although we now all have plenty more to paint. 

Royalists on the right, Parliament to the left. 
We deployed 24" apart and decided to use inches even though our figures are 15mm, it seemed to work well for us. 

Parliament troops aim to take shelter in the fields. 

We used cotton wool as smoke to denote units that had fired. 

We really like the card driven random activation of units, which seemed to favour the Royalists initially as they quickly advance. 

Parliamentarians preparing to give the advancing Royalists a warm welcome. 

Parliamentarian Cavalry advancing. 

Whilst my infantry hold and fire my cavalry go charging in. 
It was as the armies met in melee that the game slowed down as we tried to work things out correctly. We found applying the various stages of Shaken/Routing/Destroyed correctly a bit confusing and there was much rule searching and head scratching. 

A view from the Royalists line just as there is about to be a cavalry clash. 

Red counter = Casualty Marker, Yellow = Shaken. 
Nigel's foote fired and halted my cavalry just before they charged home. 
Ian then charged me in the flank with his cavalry causing my guys to rout. 

After seven turns there were enough Royalist troops routing to call a Parliamentarian victory. This is where we got a bit confused. Is a Shaken unit that now routs still classed as Shaken as well as Routing? Questions like this arise when you play a set of rules that is only 13 pages long. We decided that for this game to treat Rout and Shaken as differing states although I am not sure?. We also got confused over whether a routing unit that you try to rally and fail then becomes destroyed? 
Overall we enjoy the rules and the 'event' cards added some great period feel to the game. We play again next week- after a thorough re-read of the rules. 


Trying 'General D'Armee' v2 in 15mm

  Howard, Ian and Nigel have been playing a few games of the new version of 'General D'Armee' and this week I was able to go alo...