Tuesday, September 26, 2023

15mm Fantastic Battle, The battle of Mylken Meadow.

 Part two of our mini campaign today. In the last battle Ian's Dingly Dell Green Dragon was such a tough opponent that I decided to paint up it's twin brother. This was a not too devious plot to gently take the p*** out of Ian's dragon as I have the same model. I was going to paint it blue to go into my Ice Kin army but when I was rummaging through various boxes to find the exact model to mimic Ian's I also found a ready painted Blue Dragon already based for Fantastic battles. I quickly added some snow to it's base to make it fit in with the Ice Kin's basing. I then had to decide what colour to paint my other dragon and decided upon Green to match Ian's but also as a Forest Dragon to go in my Elf Army (a mix of High and Wood Elves). 

The blue Dragon is a pre painted D+D miniature that I painted in the blue scheme a few years ago and the Green model is a Reaper Bones young Dragon, 28mm models but both ideal for big dragons in 15mm. 

I enjoyed painting this model as a break from a seemingly endless line of 28mm Dark Age Saxon Spearmen. 
Here is a photo of both two green dragons, Ian's is the front one. 

So, on to today's game. With my Ice Elves victorious they gained a +1 bonus in the dice throw to decide Attacker/Defender and also may re-throw one set of dice at any point during today's game. Today's scenario was as below...

The Battle of Mylken Meadows

Battle 2 in a mini campaign between The Fey Ice Elves and the Forces of Dingly Dell

1,000 points per side.

Having won the battle at the crossroads Crasterlon Iceheart and his Ice Elves march deeper into the lands of Dingly Dell. Gathering some re-enforcements the Ice Elves come across the army of Dingly Dell gathering re-enforcements on the outskirts of the rural town of Mylken Meadows. The Ice Elves deployed on the northern high ground of Craw Hill whilst the Dingly Dell army deployed amongst the fields and buildings on the outskirts of the town.

Deployment:

The Ice Elves must deploy on the high ground at the Northern edge of the map, no more than 6BW in.

The Dingly Dell forces must deploy all their force within 6BW of the Southern table edge.

The forces must be no more than 8BW - 10BW apart after deployment.

Random Events, p41: at the start of each turn, players throw a d6 for Random Events as detailed on p41

Victory Points: the winner gains 5VP.

If the game is a draw then both forces earn 2 VP.

Players also earn 1VP if they can get at least one company +/or character onto the enemy base line.

The winner of the battle will also gains an extra 30 points of troops for the final battle.

The game lasts for 6 turns (+1 turn if a score of 4+ on a d6 at end of turn 6) or ends when one side loses over half of their companies and /or all their characters and their Warlord (or Magelord) is killed.

Ian's mad army of Dingly Dell folk had a new gnome idol, slow moving but with a defence of 6 it was a tough opponent.

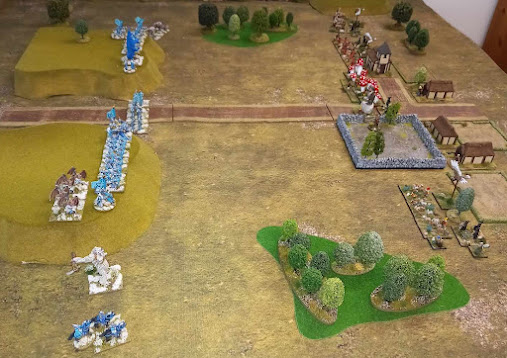
The table after initial deployment. 

Mishaps played havoc with my deployment causing resolution loss and forced my centre unit of Elite Spearmen reeling backwards. 

The Dingly Dell force was not as badly disrupted by mishaps although their new idol was forced back. Ian had specifically placed it in the centre to counter my spearmen. With both units being forced backwards they were never going to meet.  

During turn 1 my spearmen failed their Impetuous action roll and continued to move back to my table edge. This effectively took 141 points of troops and a captain out of the game. 
That had me worried! 

A photo of some of the madness my Ice Elves had to face. Rampant Elk, imps, eagles, gnomes and giant walking mushrooms. It is a wonderfully eccentric and colourful army. 
Turn 2 saw the only Random Event with an armour cache being discovered just behind the Dingly Dell forces but we got so caught up in melee no-one claimed it before the game ended.

My tiger lancers crash into the imps scattering them. 

The imps about to scatter.
Dingly Dell forces then surrounded the tiger riders who died valiantly whilst dishing out much damage themselves. The tiger lancers were to be the only unit I lost in this game.
Elsewhere my drakkonians butcher the mad goats causing them to scatter. 
My mounted crossbow who had got around Ian's flank also scattered some flying witches.  
Although I was outnumbered by the Dingly Dell forces by targeting their poor quality troops I was able to bring Ian's army to over half his companies lost by the end of turn 4, game over. 
Fantastic Battles was once again fantastic fun. 

Victory Points earned: 

Ice Elves: 5 (campaign total 9) and an extra 30 pts of troops next game.    

Dingly Dell: 0 (campaign total 1)

With just one campaign game to go it is looking good for the Ice Elves. 


Tuesday, September 12, 2023

War and Conquest with 15mm Medievals

 With Ian now having his own copy of the War and Conquest rules we thought we would give our 15mm Hundred Years War figures an outing to further test the rules. We used a scale of half an inch to each real inch for moving and firing and this seemed to work very well. There were also a few unit types we 'adopted' from the Wars of the Roses list to make up our 2,500 point forces. We also discovered that you do not get many units when so many of the troops are very well armed and armoured as all that kit costs points. Using some of the guidelines from the rulebook about terrain and deployment we ended set up as in the photo below, Ian's French on the left, my English on the right. 

I had a piece of light artillery deployed in the centre of my line, first shot it maxed out with it causing 5 damage to the central unit of French Knights who survived the ensuing Morale Test. 

Ian's very strong centre, three very colourful units of French knights. 

My Hobilar's guarding my right flank. They held this position for three turns before chasing off a unit of French bidet's in the final turn. 

My English held their line and deployed stakes in front of the archers as the French closed in.
The author of the rules, Rob Broom had very kindly suggested some rules on how to use stakes in the game. The French knights avoided charging the stakes and their infantry never reached them so sadly those rules never got tested.  
The English longbow units were reeking havoc amongst the advancing French Infantry thanks to some great dice throws.

The French Knights tried to charge too soon, all three failed to reach the English line. In my turn my dismounted knights gleefully charged the central unit of knights causing them to flee. 

The Knights then charged my billmen and the artillery on the hill. Surprisingly the artillery held for one turn whilst the billmen using their halberds ans rank bonuses defeated the knights on the second round of melee as some longbow came crashing into the flanks of the knights.  

The artillery threw an amazing 3 on their Morale check to survive...for one more turn.  

The billmen waving goodbye to one of the French Knight units. 

With two out of three units of Knights destroyed by the end of turn six, the loss in points for the French was so huge that a comfortable English victory was declared. 

Another fun game and we have just about got the main rules sorted now but I will still have a re-read of a few sections to double check. Back to the Dark Ages for our next game probably. 


Thursday, September 7, 2023

More 28mm Dark Ages

 Having enjoyed my first game of War and Conquest last week I was delighted to be invited over to new gaming friend George's house for another game, also set in the Dark Ages. George had spotted my post from last weeks game and happily he lives just a few minutes up the road from my daughter so not too far from me. George also has an amazing wargaming room, the whole of an old shop and plans are in place to make this into a wonderful gaming room.  It has not been converted into his ideal gaming room yet but even now it is an amazing space. It is also great to see another gamers collection of figures and amongst many forces George has a wonderful Seleucid army which he also used for games of War and Conquest. A new project for me next year perhaps? 

Use your imagination, how would you turn this wonderful space into the gaming room of your dreams.

This game saw my Norman's pitted against George's Saxon Heptarchy army. 
This photo shows my Normans advancing steadily. 
Sadly my photo of George's force came out to dark to be of any use.  

My skirmish archers were hiding in the front edge of the wood as my Milites advanced towards the Saxon cavalry. George had four large units of skirmishers screening the front of his units which were a real nuisance. 

George's Saxon Cavalry advance. 

Pesky skirmishers 

Happily my Pueri Light Cavalry smash through George's Skirmishers on my left flank. 
So far so good!

The centre saw a huge clash of infantry.

Suddenly it all started to go wrong as the Saxons won melee after melee.

The Saxon light cavalry see off my skirmish archers. 

There is hope as a unit of Milites defeat the Saxon cavalry and chase them off. 

With several units fleeing we called it a Saxon victory. This was a great game and I certainly learnt a lot about the rules which has to be a good thing. Thanks to George for hosting, hopefully we can get some more games in soon. 
Having played two games I am now busy redesigning  my Norman army with a mix of painted and unpainted figures, bases and movement trays on my desk. Both George and Charlie tended to use slightly larger units than I did which was interesting to note. Some of my units may increase in size and I am going to look more carefully at my weapon choices. 

George has also done a blog about our game; afterall history is usually written by the winners! You can read his thoughts on the game at the following link. 

Musings on Wargaming and Life: Normans again! (musingswargameslife.blogspot.com)

Tuesday, September 5, 2023

15mm Fantastic Battles: The Well at the Crossroads

 With just Ian and myself playing this week we opted for a game of our favourite fantasy rules 'Fantastic Battles'. In the most recent issue of 'Wargames, Soldiers and Strategy' there was a simple campaign for the ECW called 'For King and Kingdom' which looked easy to adapt to any period and would certainly suit our now occasional games of FB. Ian opted to be the Royalists using his Dingly Dell/Nature force ( a totally bonkers army) which left me the role of the Parliamentarians using my Ice Elves. WSS always includes beautifully drawn maps and these are easy to translate into wargames terrain and for the first game of our mini campaign I came up with the following scenario, adding a touch of fantasy here and there.  

The Well at the Crossroads.

Battle 1 in a mini campaign between The Ice Elves and the Forces of Dingly Dell. 

800 points per side.

Marching down from Nilheim and across the Feldros Mountains it was vital to their invasion plans that the Ice Elves captured the important crossroads along Ceolfrids Way. Rushing towards the crossroads to oppose them the forces of Dingly Dell were desperate to protect their lands from the ravages of war.

Before deployment, throw a d6 to decide on the position of the well, placing the well on the corresponding circle on the map. A small farm should also be randomly positioned on the table.

Deployment:

The Ice Elves may deploy up to half of their companies within 4BW of the Northern side of the crossroads, the rest of their force deploys within 4BW of the Northern table edge.

The Ice Elves must deploy all their force within 6BW of the Southern table edge.

Random Events, p41: at the start of each turn, players throw a d6 for Random Events as detailed on p41

The game ends when one side loses over half of their companies and /or their Warlord (or Magelord) and all other characters are killed. At this point the victors may take possession of the crossroads as their enemies flee or withdraw.

Any force who has unopposed possession of the well at the end of the game should throw a D6. On a score of 4+ they will find a relic deep down in the well. Throw a D12 on the table on p18 to randomly select the relic.

Victory Points: the winner gains 3VP and also gains a +1 bonus to the dice throw to decide Attacker/Defender next game. They may re-throw one set of dice once at any point during the second battle.

If the game is a draw then both forces earn 1 VP.

Earn 1 VP for unopposed possession of the well and 1 VP for unopposed possession of the farm. 

Victory Points earned:     Ice Elves:   4, but no relic found in the well  

                                        Dingly Dell:    1

After our initial deployments we rolled for 'mishaps' which led to one of my expensive companies of tiger riders fleeing, several units on either side lost resolve and some of Ian's units had to re-dploy either forward or backwards. The higher than usual number of mishaps caused a re-think in tactics. The photo below shows the main deployment.


Turn 1 and I made a quick advance with my spearmen (top centre) aided by the Blink spell, forgetting that I had now moved out of the command radius of my captain. Shows how much of the rules I had forgotten. 

Ian's newest Dingly Dell unit, a gnome and his goats. 

The Dingly Dell dragon is perhaps my favourite figure in Ian's force, great painting too. 

The Dingly Dell goats about to be crushed by the Ice Elf spears and their Yeti friend. The fate of all newly painted units in the whole history of wargaming.  

Dingly Dell Pirate artillery shelter behind some imps. Ian was commenting on how taking artillery could be a waste of points sometimes, little did he know at this stage.  

Goats about to be crushed.

Some large friends turn up to help the goats.

But too late, the goats are toast!

Ice elf archers shoot at the 'Old Ones'  (mysterious nature spirits). 
Needing '6's to hit they did rather well. 

The Old Ones charge in, but helped by some mounted crossbow elves, the Old Ones are scattered. Suddenly the forces of Dingly Dell have lost enough companies to be close to defeat and it is only turn 3. .  

Suddenly the Dingly Dell artillery open fire on my Tiger Lancers and with a lucky dice throw take out my Warlord. Ian now thought that his artillery were points well spent! 

The Dingly Dell Dragon takes on the Ice Elf Drakonion allies, an epic struggle ensued and Ian started to fight back. The next two turns saw the Ice elves loose a few companies but...  

The Tiger riders win the fight against the giant slug and game over. 
During this game both sides lost at least half of their characters. I was very glad to kill the hated Robyn of the Hood with his phoenix bow. 

The victorious Ice Elves claim the crossroads and the well. Sadly I did not throw high enough to find a relic but could claim a total of 4 victory points. Ian, with his dragon and some witches sat on the farm could claim one victory point. 
As always, 'Fantastic Battles' gave us a highly entertaining game with much merriment caused by all the goings on. In the second, larger battle the Ice Elves will delve deeper into Dingly Dell lands. 


The Battle of Hedgeley Moor, 1464.

  There were three of us gaming today, pooling our figures to play the Battle of Hedgeley Moor scenario from the new 'Hail Caesar' W...