Tuesday, November 28, 2023

15mm Victory without Quarter.

 For our first game of 'Victory without Quarter' in 15mm we played a basic made up battle scenario, very much as a learning game. With several units per side I took control of the Parliamentarians with Ian and Nigel in command of the Royalists. 

We had tried the rules before using our 6mm figures but felt then that they would better suit 15mm so we gave it a go. The two armies were limited by our narrow range of units available at the moment, although we now all have plenty more to paint. 

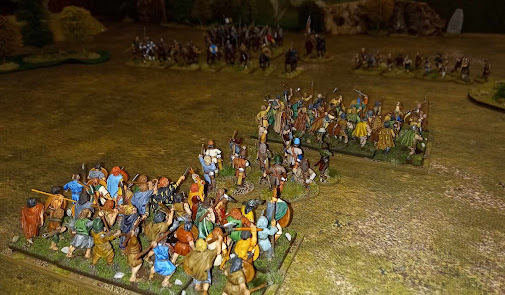
Royalists on the right, Parliament to the left. 
We deployed 24" apart and decided to use inches even though our figures are 15mm, it seemed to work well for us. 

Parliament troops aim to take shelter in the fields. 

We used cotton wool as smoke to denote units that had fired. 

We really like the card driven random activation of units, which seemed to favour the Royalists initially as they quickly advance. 

Parliamentarians preparing to give the advancing Royalists a warm welcome. 

Parliamentarian Cavalry advancing. 

Whilst my infantry hold and fire my cavalry go charging in. 
It was as the armies met in melee that the game slowed down as we tried to work things out correctly. We found applying the various stages of Shaken/Routing/Destroyed correctly a bit confusing and there was much rule searching and head scratching. 

A view from the Royalists line just as there is about to be a cavalry clash. 

Red counter = Casualty Marker, Yellow = Shaken. 
Nigel's foote fired and halted my cavalry just before they charged home. 
Ian then charged me in the flank with his cavalry causing my guys to rout. 

After seven turns there were enough Royalist troops routing to call a Parliamentarian victory. This is where we got a bit confused. Is a Shaken unit that now routs still classed as Shaken as well as Routing? Questions like this arise when you play a set of rules that is only 13 pages long. We decided that for this game to treat Rout and Shaken as differing states although I am not sure?. We also got confused over whether a routing unit that you try to rally and fail then becomes destroyed? 
Overall we enjoy the rules and the 'event' cards added some great period feel to the game. We play again next week- after a thorough re-read of the rules. 


Thursday, November 23, 2023

28mm War and Conquest: Normans v Patrician Romans.

 Wargaming friend George invited me over to his house today for another game of 'War and Conquest'. Since our last game I had re-thought my Norman list and also painted quite a few new figures to add into my new or enlarged units. George opted to use his Patrician Roman army which is composed of some units that would prove to be quite testing to my Normans. 

George's Patrician Roman deployment.

Norman deployment, not sure I was too happy with this? 

Overview of the table from behind Norman lines. 

My Norman Milites advance on my left, covered by my Peuri Light Cavalry.

Roman horse archers supported by Germanic allied cavalry sweep forward to meet the Norman cavalry. The horse archers and their ability to shoot then flee before re-grouping the following turn was a difficult tactic to counter other than by charging them (and being lucky in catching them). 

The Norman Peuri light cavalry just before they were defeated by those pesky horse archers. 

The infantry in the centre start to close upon each other. 
It didn't end well for my Norman's. 

The Norman's on the right try to use their superior firepower to good effect. 

The Germanic cavalry didn't like it 'up em' and were defeated in melee by the Norman Knights. 

My other unit of Knight's surprised both George and me by defeating a large unit of warband. My dice throwing was very good in this round of play. 
At this point in the game my cavalry success on the left flank gave the Normans hope. 

But...George's Roman infantry quickly overpowered my weaker units of Liberi Spearmen and their Stipendarri allies and my centre was in real trouble. 

Although my cavalry had caused mayhem on the left, in the middle and on the right George's infantry slowly forced the Normans back in melee after melee and after seven game turns I conceded the game. 

This was an excellent game where at one point I felt I had a real chance of a win only for the fortunes of war to completely turn the game in George's favour for what was eventually a convincing win for him.
Does this mean I need to re-design my Norman list again? 


Tuesday, November 21, 2023

More Dark Age War and Conquest, the Battle of Arngill Moor, 1068.

 I made a few 'Shieldwall' markers and double sided Charge/Flee counters for our games of War and Conquest. The shieldwall markers are made from some of the many spare shields you get with plastic figures. 

Moving on to today's game of more fictitious battling based around 1068 in the North of England.  Ian as the Irish King Cathal regrouped his forces and those of his ally Aelfric (Nigel) with his Anglo-Danes. Following some of the guidelines for deployment etc... in the rules I came up with the map below. As I had set the table up Ian and Nigel had the choice of which table edge/deployment zone they wanted. We also decided to try the Battlefield Objectives for the first time. 


The first action was on my left flank where I moved forward with my light cavalry but they were chased away by the Irish Light Cavalry. 

Ian then had 11 shots at my Norman Knights needing 5's or 6's, scoring 9 hits. At this point it looked like the gods were with the Irish. My dice throwing was the opposite of this!   

Nigel advances his Anglo Danish with Ian's Irish Warbands also moving forward in the background. 

My Knights chased off the Irish light cavalry and then proceeded to rampage around behind the Irish/Anglo Danish lines. All sorts of mayhem and melee happened. 

Nigel turned his Huscarles to face the Norman knights trapping them near the table edge and so a mighty melee ensued but my Knights were defeated and fled the table.  

View of the Norman Cavalry getting around the allies rear. 
My battlefield objective was to try and secure the centre of the table but in the mix of everything going on I forgot about this. Ian and Nigel's objective was to destroy my two most powerful units and they had already got one of the units of knights. 

From this point I forgot to take any more photo's but Nigel rushed his Spearmen forward and with my Knights getting trapped behind the Allies things looked bad for the Normans. However my luck with the dice took a much needed turn for the better and with the Normans having better armour values  they were able to fight their way out of a tight predicament defeating an Irish warband and two units of Anglo Danish spearmen and the huscarles to win the battle. Great fun, particularly as the start of the battle did not go well. 

Next week we swap to 15mm ECW using the 'Victory without Quarter' rules.  


Tuesday, November 14, 2023

28mm Normans v Anglo Danish and Irish (using War and Conquest).

 For todays game using our growing collection of 28mm Early Medieval/Dark Age figures I 'borrowed' a scenario idea from a 'Wargames, Soldiers and Strategy' magazine. One force is split in half and so deploys half facing the enemy and the other half coming in from one flank. A quick dice throw from Ian soon decided that his newly painted Irish Warbands with their Anglo Danish allies would deploy as a group meaning that my Normans had to divide their forces between the two other deployment zones. 

Deployment:Normans left and top right, Irish and Anglo Danes to the right. 

Big block of Irish warband (on the left) heading my way. 

The Norman flanking force. 

Norman infantry battle line. 

The Irish did not hang around but came straight for the flanking force. 

The Anglo Danes decided to hold whilst they saw what happened on their right. 
White gem tokens represent 'SIP's (Strategy Intervention points). 

Norman light cavalry chase away some Irish skirmish archers. 

The Irish light cavalry at the top tried to break through around the warband but my skirmish archers caused just enough casualties to cause them to flee all the way back to their base line. 

The Norman Knights and skirmish cavalry clash with the warbands.

The left hand warband breaks in the second round of melee.
Next turn both cavalry units turn towards the next Warband.

There was then a big clash of units on my right. My dismounted Milites broke some Anglo Danish Spearmen but could not break the Huscarls. The Norman archers fled from the other opposing spearmen.
This was quite a complex melee to work through and sadly we ran out of time. With the Irish having lost a warband and a unit of spearmen fleeing compared to just the Normans having lost no units and just their archers fleeing we called it a Norman Victory, especially as the Normans also had their cavalry now free on the left advancing rapidly towards the enemy. 

It is a shame we ran out of time as this was lining up to be a great clash in the centre. It was our scanty understanding of some aspects of the rules that let us down. We have both vowed to read up on the rules ready for next week when the two sides will clash again. 


Wednesday, November 8, 2023

Fantastic Battles in 6mm

 The fantasy rules 'Fantastic Battles' has been an instant favourite amongst my friends and I since we first discovered them 3 years ago. We really like how you can take the basic troop types given and by adding 'traits' create the fantasy army of your choice. The rules are also very well designed giving a thoughtful but fun game. Since buying the rules in November 2020 I have created three armies in 15mm (Ice Elves, Barbarians and Wood Elves) and more armies in 10mm (Elves, Barbarians and small LOTR themed forces for Rohan, Dwarves and Orcs). 

One of my gaming friends Chris considered 6mm figures for Fantastic Battles using the Irregular Miniatures 6mm Fantasy range a while ago but nothing really came of it...until recently. Chris came across some rules we had written for 6mm Fantasy games way back when (his loft is an Aladdin's Cave of gaming stuff from the mid 1970's onwards) and the discovery of these has prompted us to revisit the 6mm idea but using Fantastic Battles this time. 

We have re-thought the basing for the smaller scale as each strip of the Irregular Fantasy range is a fraction under 25mm wide, so 25mm square bases it was. We also decided to use an inch (25.4mm) as the unit of measure as what is 0.4mm between friends? 

I used to have Elves, Dwarves, Centaurs etc... for 6mm gaming but sold them off some years ago. Happily Chris had given me some Dark Elves so these became my first 6mm army for Fantastic Battles. I got so keen on the idea that I even created my own gaming mat from some left over material that had been gifted to my wife. It only needed to be 30" x 20". It was a piece of dark green felt and by using spray paints followed by acrylic paints I soon created the mat in the photo below (with a few painted companies of Dark Elves for scale and some 10" rulers I made). 


The next photo shows my Dark Elf army so far, 22 companies and seven characters with more to come. One of the worries we had about the 6mm range was would there be sufficient variety of troops? 


Here we have three companies of Witch Elves at the front, crossbows at the rear left and Dark Elf Warriors on the rear right. 

Four companies of lizard riders and one company of skirmishing lizard riders made from two mounted heroes plus a mounted command stand. 

All seven command/character stands plus four bases of 'Shadow Elf' skirmishing missile troops made by cutting up strips of Dark Elf Crossbow men. 

Top secret painting project, (should I be letting Chris see this???) a black dragon next to the witch elves for scale. This is a Reaper Bones baby black dragon but seems ideal for this scale. There are also two large ballista which I forgot to take close ups off so plenty of troop variation available with a bit of imagination. 

Finally for now is a Giant Lizard with Howdah. The crew in this look like lizard men close up but with a bit of filing and painting in my dark elf warrior colour scheme they look OK.
I still have more characters, crossbowmen, warriors and also some chariots to do but I am already over 1,000points. How many more companies do I need? 
Chris is currently working away on creating a dwarf army supported by centaurs, early progress photos look good and I can't wait to get a game in with these figures soon.  


The Battle of Hedgeley Moor, 1464.
  There were three of us gaming today, pooling our figures to play the Battle of Hedgeley Moor scenario from the new 'Hail Caesar' W...